How to Install Wall Paneling
Once your layout is planned, it's time to install. This guide walks you through every tool you'll need and the step-by-step process to get professional-looking results.
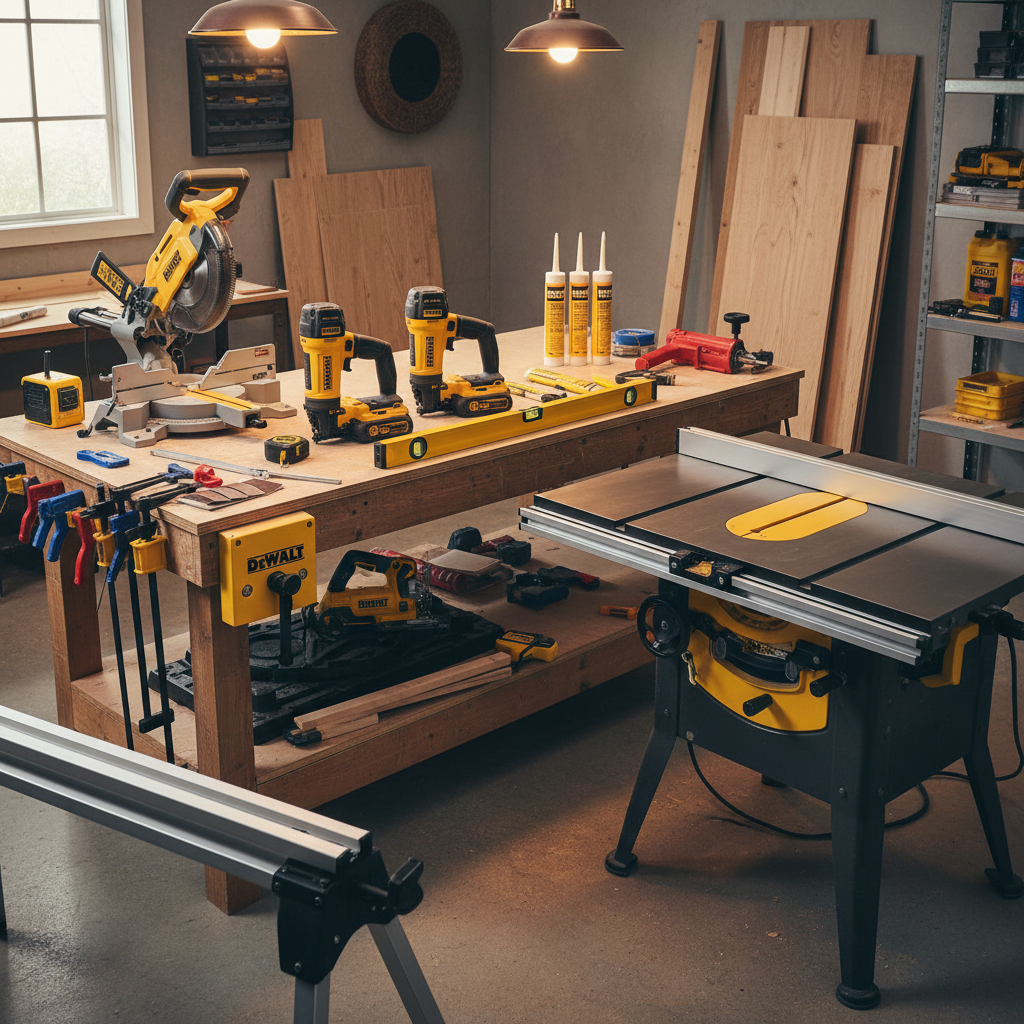
Tools You Will Need
Having the right tools ready before you start will save time and frustration. Here's the full list, broken into categories.
Measuring & Layout
- Tape measure — a 25 ft tape is standard; get one with an easy-read blade. The Stanley FATMAX 25 ft is a great choice.
- Spirit level (4 ft) — essential for checking plumb stiles and level rails. The Stabila Type 196 is an industry standard.
- Combination square — handy for marking 90° and 45° cuts on stiles and rails. The IRWIN 12″ combination square is a solid choice.
- Stud finder — electronic is best; you need solid fastening into framing. The Franklin Sensors ProSensor T13 is a favourite. (Franklin Sensors ↗)
- Chalk line or laser level — snap a perfectly level reference across the full wall. The IRWIN STRAIT-LINE chalk reel is a jobsite staple.
- Pencil & marking knife — pencil for layout lines, marking knife for precision cuts.
Cutting
- Miter saw (10″ or 12″) — the workhorse for cross-cutting rails, stiles, and cap moulding to length. A miter box and hand saw will work for small jobs. The DEWALT DWS779 12″ sliding miter saw is hard to beat.
- Table saw or track saw — for ripping panels and rails to width. A track saw is especially useful on-site. The Makita SP6000J is a top pick.
- Jigsaw or oscillating multi-tool — for cutting around outlets, switches, and other obstructions. The DEWALT 20V XR jigsaw handles trim work well.
- Sandpaper (120- & 220-grit) — clean up cut edges before fitting. A 3M assorted-grit pack covers all your needs.
Fastening
- Brad nailer (18-gauge) — the go-to for pinning panels and trim. 1¼″ and 2″ brads cover most situations. The DEWALT DCN680 is a top-rated cordless option. (DEWALT ↗)
- Finish nailer (15- or 16-gauge) — for heavier rails and cap moulding that need more holding power. The DEWALT DCN660 16-gauge pairs perfectly with the DCN680.
- Construction adhesive — liquid nails or PL Premium for a permanent bond on rails and stiles. Loctite PL Premium is the pro favourite.
- Clamps — hold pieces tight while adhesive sets or while you nail.
Finishing
- Caulk gun & paintable caulk — seal the top rail to the wall and fill any gaps for paint-grade work. DAP Alex Flex is a reliable paintable caulk.
- Wood filler — fill nail holes and small imperfections. Use stainable filler for stain-grade projects. DAP Plastic Wood-X works for both stain and paint grade.
- Putty knife — for applying and smoothing wood filler.
- Sanding block or orbital sander — smooth filled areas before priming/painting. The DEWALT 20V XR 5″ random orbital sander is great for trim work.
- Painter's tape — mask off areas for a crisp finish line.
Step-by-Step Installation
1) Prepare the Wall Surface
- Remove outlet/switch covers and any existing trim or baseboard you plan to replace.
- Patch any holes or damage with joint compound and let it dry.
- Use your stud finder to locate and mark every stud with a pencil—you'll reference these throughout the install.
- Wipe down the wall to remove dust so adhesive bonds properly.
2) Install the Plywood Backerboard
Before any trim goes up, fasten 1/4″ veneered plywood to the wall within the paneling area. The backerboard serves a critical purpose: it gives your vertical stiles, horizontal rails, and any decorative trim moulding something solid to nail into. Without it, your brads are biting into drywall alone, which doesn't hold well over time.
- Cut the plywood to cover the full area between your baseboard and where the top rail will sit.
- Apply construction adhesive to the back of the plywood in a zigzag pattern and press it firmly against the wall.
- For extra hold, nail or screw the plywood into studs — but only where the nail holes will be hidden by horizontal rails or vertical stiles later on. Plan your fastener placement against your layout so every nail hole gets covered by trim.
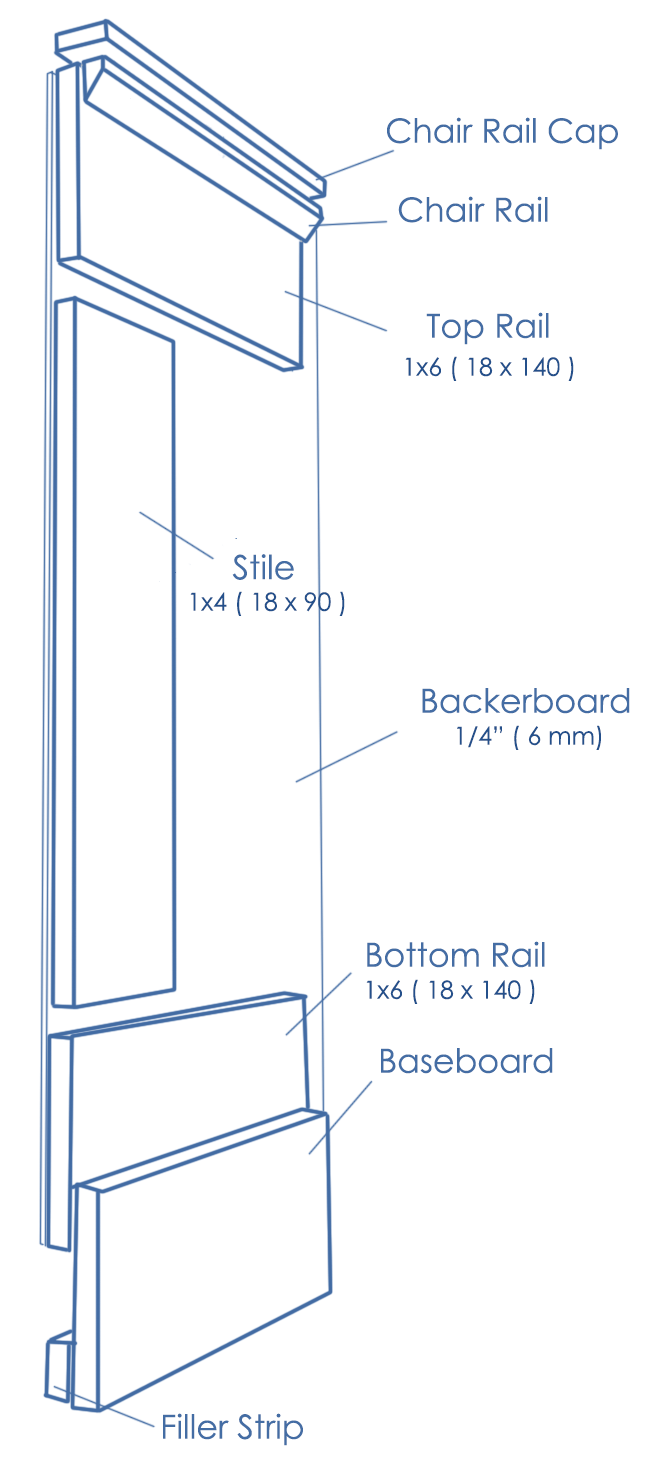
Panel Assembly Layers
The diagram shows how each layer stacks on top of the drywall. The 1/4″ backerboard goes on first, then the rails and stiles frame out the panel openings on top of it. The panel fields sit flush within those openings, and the chair rail cap finishes the top edge.
Every piece of trim — stiles, rails, and decorative moulding — nails through the backerboard, giving your brads solid plywood to grip instead of crumbly drywall.
3) Establish a Level Baseline
Snap a chalk line or project a laser level at the height where your top rail will sit. This is your most important reference—everything hangs from it. Double-check level across the full wall length; floors and ceilings are almost never perfectly level.
4) Install the Rails
- Cut your bottom rail to length and fasten it to the wall along the bottom, nailing into studs.
- Apply a bead of construction adhesive behind the rail for extra hold.
- Install the top rail along your chalk line, again into studs. Check level one more time.
- If your wall has inside or outside corners, cope or miter the rail ends for a clean joint.
5) Install the Stiles
- Starting from one end of the wall, cut each stile to fit between the top and bottom rails.
- Check plumb with your spirit level before fastening.
- Apply adhesive to the back and pin with your brad nailer through the stile face. Because the plywood backerboard is behind the stile, your brads have solid material to bite into — not just drywall.
- Work across the wall, spacing stiles according to your layout. Use the calculator to get exact stile positions.
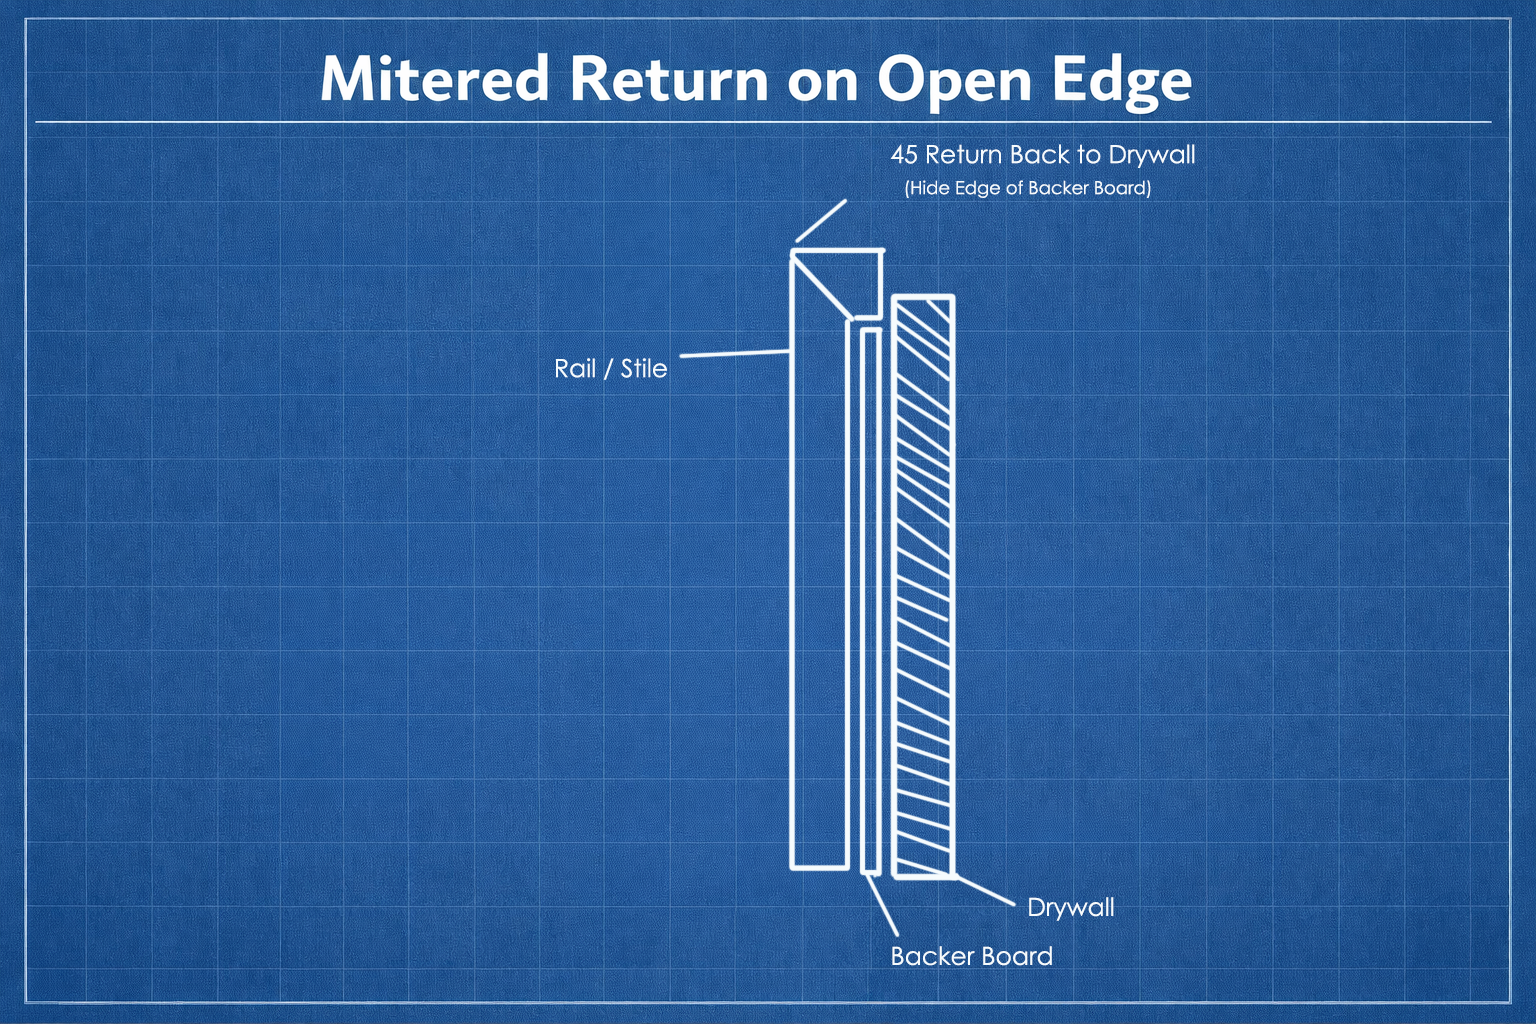
Mitered Returns (top-down view)
Anywhere a stile or rail has an exposed edge — where you can see the side profile sitting on top of the 1/4″ plywood — you need a mitered return. Cut a 45° miter on the exposed end and glue a small return piece that wraps back to the wall, hiding the plywood edge.
This is most common on the outer stiles and rail ends where paneling terminates at a door opening or the end of a wall. The return gives a clean, furniture-quality detail instead of a raw end grain and visible plywood layer.
6) Cut and Install Panels
- Measure each opening individually—walls shift, and no two openings are exactly the same.
- Cut panels about 1/16″ undersized in both width and height so they drop in without force.
- Apply a dab of adhesive to the wall and pin the panel with 18-gauge brads into the backing or studs.
- For outlets and switches, mark the cutout on the panel, drill a starter hole, and use a jigsaw to cut the opening.
7) Add the Cap Moulding
The cap sits on top of the top rail and gives the paneling a finished look. Attach it with a 15/16-gauge finish nailer. Miter inside and outside corners, and use a return cut at open ends for a polished detail.
8) Caulk, Fill, and Finish
- Fill every nail hole with wood filler. For paint-grade work, any filler works; for stain-grade, match the filler to the wood.
- Once filler is dry, sand smooth with 220-grit sandpaper.
- Caulk the top rail to the wall and any gaps between panels and stiles (paint-grade only).
- Prime everything before painting. For stain-grade, apply a pre-stain conditioner, then stain, then topcoat.
Pro Tips
- Acclimate your wood. Bring lumber into the room at least 48 hours before installing so it adjusts to the humidity.
- Work from the most visible corner outward. Your tightest, most visible joints should get your freshest cuts.
- Test your nailer on scrap. Adjust depth so brads sit just below the surface without blowing through thin stock.
- Dry-fit before gluing. Hold pieces in place to verify fit before committing with adhesive.
- Keep a damp rag handy. Wipe away adhesive and caulk squeeze-out immediately—it's much harder once it dries.
Related Guides
- How to Layout Wall Paneling — plan your panel widths and avoid skinny end panels before you cut.
- Stain Grade vs Paint Grade Paneling — choose the right materials, fillers, and finish for your project.
- Wainscot Panel Sizes — common panel widths and wainscoting height ranges.
- Wainscoting Cut List — cut list guidance for rails, stiles, and panel fields.